Thursday, November 14, 2013

November Glam Bag Makeup Tutorial

Hey everyone!  Yesterday I received my November Glam Bag in the mail and thought I would create a look using some of the products I received!  If you haven't heard of Glam Bag, click here to read my post on it from last month, where I go over all the details!  But basically, it is a beauty box subscription service and for only $10.00 a month, you receive a makeup bag full of sample and full size products!

I have to say, this month was EXCELLENT.  I thought the product selection was great, and the fact that we were also given a full size Em by Michelle Phan product to try made me so happy!  (We also received a 30% off coupon code for Em by Michelle Phan products, so of course I picked up a few of her fan favorites- expect a review to come soon!!)


 In this months bag, I received a Bombshell lip crayon in the color "shameless," a Pixi bronzer in the color "subtly suntouched," a Nailtini polish in the color "caviar cocktail," an Em by Michelle Phan lipstick in the color "cupcake pink," a Starlooks eye pencil in the color "amethyst," and a sample of HSI Professionals argan oil hair treatment.  Below, I have swatched the lipsticks and eye pencil if you are interested in purchasing them!


For this tutorial, I will be using the Starlooks eye pencil and the em lipstick to create a perfect makeup look for day or night!  To begin, start by priming your eyes with an eyeshadow primer.  This will ensure your eyeshadows do not budge throughout the day and also keep them crease-free.  Because we will be using a creamy eye pencil, we will need a good base for the pencil to adhere to, making eye primer extra important for this look.  I am using Urban Decays Shadow Potion, and it works great!  If you are interested in it, you can check it out here.


 Next, take the Starlooks eye pencil and apply it all over your lid. This eye pencil was super creamy ( I was surprised!), so it was very easy to apply it directly onto the lid.  Blend out the color with your finger or a blending brush to make sure there are no sharp edges.

To set the cream pencil, I applied a MAC pressed pigment in the color "black grape" to the lid, as well as swept some across my lower lash line.  I concentrated the pigment on the outer corners of my eyes, to create a gradual smokey eye.  

Pressed Pigments are my absolute favorite- they are so easy to use, you can apply them with your fingers, they come in tons of great colors, and they aren't as messy as loose pigments!  Have I sold you on them yet!?  


 Next, line your upper and lower lash line in a black liner of your choice, and apply a few coats of mascara to your upper and lower lashes.  I also took some white eyeliner and applied it along the inner half of my lower lash line.  By doing this, it opens up the eye and makes it look larger!  You can also use a nude liner for a similar effect.


 Now, since my lashes are pretty much non-existent, I am going to apply some falsies!  My favorites are the demi lashes by Ardell!  If you are just starting out with false eyelashes, or have never used them before, I recommend trying demi lashes.  Since they only go on the outer half of your lash line, they are easier to blend into your natural lash line.  Our natural lashes tend to get thinner and shorter toward our inner eye, so sometimes it can be hard to blend in false lashes that go all the way across.


After I applied the falsies, I added some white eyeshadow to the inner corners of my eyes.  This brightens up your eyes, as well as making them look larger!  


Lastly, for lips I applied Em by Michelle Phans sheer lipstick in "cupcake pink" and topped it off with some pink lipgloss by MAC!  


 I really hope you guys enjoyed this makeup look!  It was pretty easy to do, and I think it would be perfect for holiday parties!

Thanks for reading!

xoxo
linds&bells


IFB Follow on Bloglovin

Wednesday, November 13, 2013

Makeup Brush Maintenance

I need to take my own advice here, but taking care of your makeup brushes is very important.  We invest so much money into them, but sometimes forget they need a little upkeep every once in awhile!  I mean one high end brush can be upwards of $50.00, and I want that thing to last!

Here are my picks to keep your makeup brushes in tip top shape!


I should be deep cleaning my brushes at least once a week, but I'll be honest, that rarely happens.  It's more like once every three weeks.  I usually just spot clean my brushes with the Sephora brand "Daily Makeup Cleaner," which quickly removes any makeup from the surface of the brush.  It works really great if you need to use the same brush for different eyeshadow colors, or switching from bronzer to blush!  However, it just removes the outermost layer of product, without deep cleaning the bristles.  I usually spray it directly onto the brush and swipe it a few times on a tissue.  If you are interested in it, click here.


However, when I am really feeling motivated, I like giving my brushes a deep cleaning using baby shampoo.  It works just like any expensive name brand brush cleaner, and is very gentle on the bristles.   It completely removes all traces of makeup and leaves my brushes feeling silky soft.  You can purchase a huge bottle of it here for $2.99 (I got mine from Target), making it a great inexpensive option (and the better option, in my opinion) for brush cleansers.   I normally wet the brush first and take a pea size amount of the shampoo and apply it to the bristles.  After massaging it in, I watch three weeks worth of foundation pour out.  Gross, but weirdly satisfying.


I repeat this process for every makeup brush, except for my beauty blender, which I clean separately with the matching beauty blender cleanser (check it out here).  It doesn't necessarily work better than the baby shampoo, but I bought them together in a kit, so I tend to reach for it when cleaning it.  I probably won't be repurchasing this, as it is pretty expensive, coming in at $18.00 for the small size bottle.


Are you guys good about cleaning your brushes? What is your favorite brush cleaner?  Let me know in the comments below!

Thanks for reading!

xoxo
linds&bells

IFB Follow on Bloglovin

Tuesday, November 12, 2013

Old Candle Jars? Try this...

I don't know about you, but I have a serious obsession with Bath and Body Works candles...especially when they are 2 for $22.00.  But once I burn them, I never know what to do with the empty glass containers!  I feel like they have to be used for something cute!  Do you feel the same way, or is it just me?  I can be a bit of a pack rat....

Well if you too want an easy idea on revamping your empty glass candle containers, how about turning them into cute decor pieces to store makeup brushes, hair clips, rings, or anything your little heart desires?!  Want to know how?  Keep reading...

The first thing you will need for this project is an old candle in a clear glass jar (make sure there is less than an inch of wax left), or a brand new glass container from Michaels Craft Store, which will work too (and you will be a few steps ahead).  I am using two old candles from Bath and Body Works.


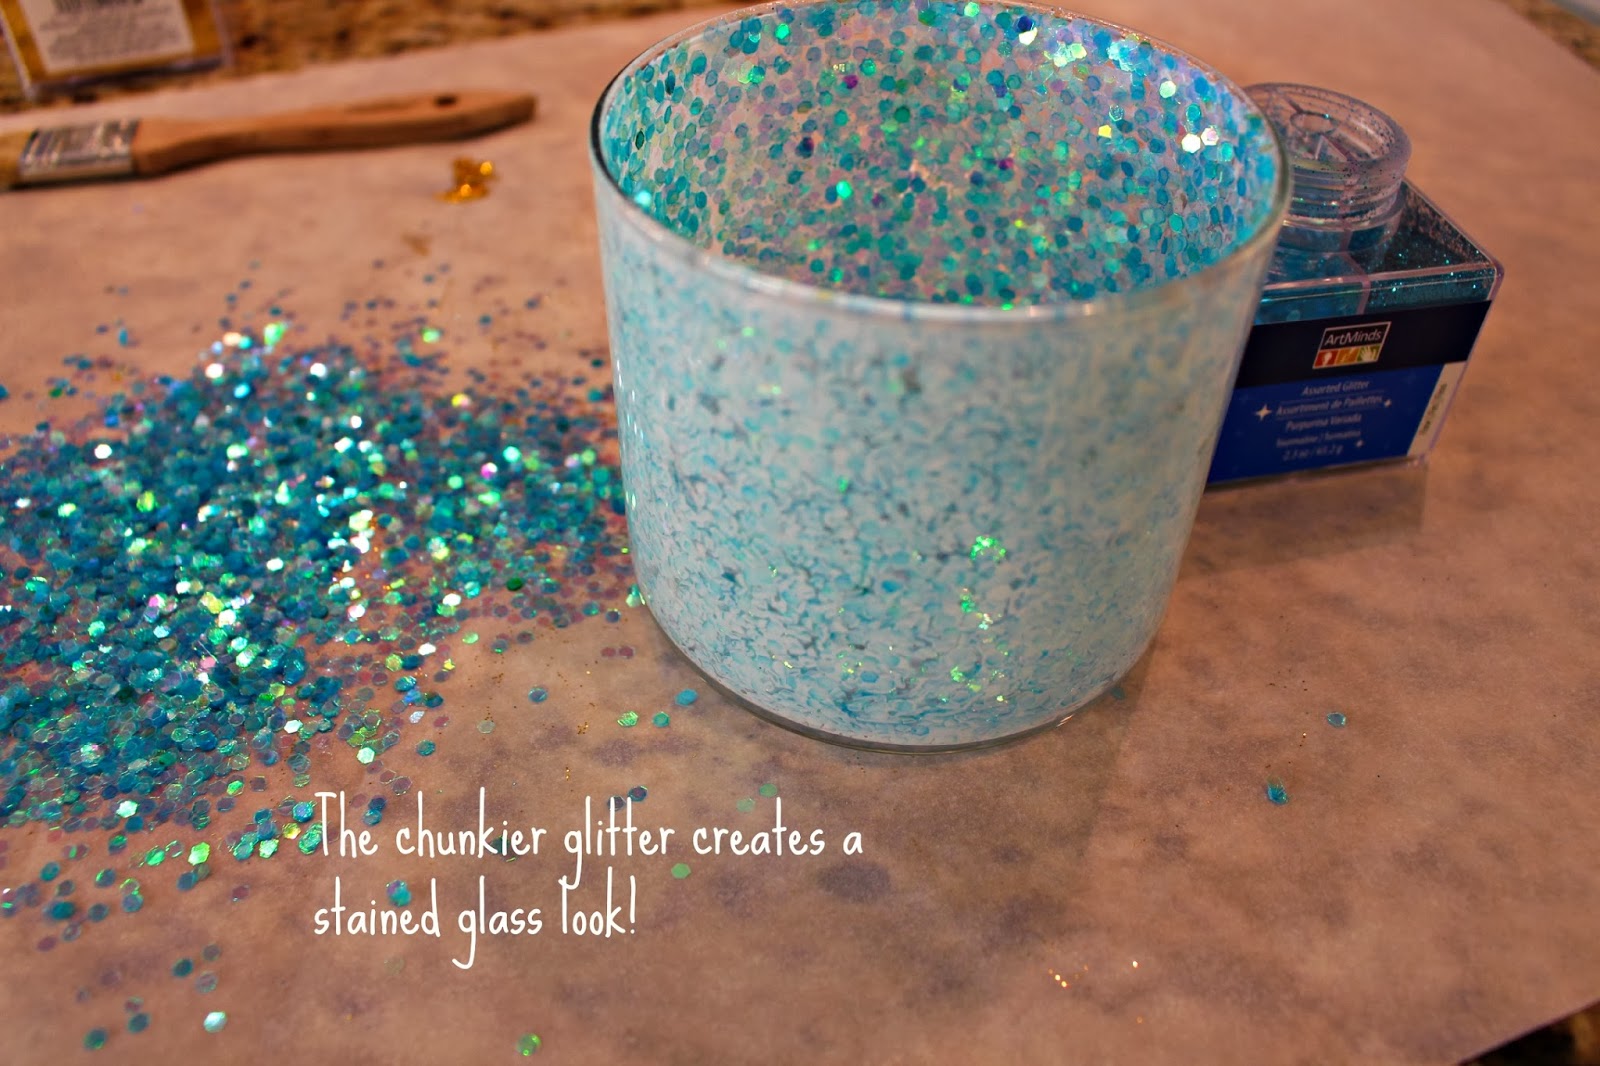
You will also need some wax paper, mod podge and a container of glitter in whatever color you like (I found all of these at Michaels Craft Store)!  I picked up a very fine gold glitter, as well as a chunky turquoise glitter.  The fine glitter created an opaque surface, while the chunkier glitter made more of a stained glass look.  Just pick whichever one suits your taste!  Make sure to pick up a craft brush too!


To begin:
1. Place your candles in the freezer for a few hours or overnight.
2. Take out your candles and carefully use a knife to pop the remainder of the wax out.  By freezing them, it will make the wax less sticky and more willing to pop out of the glass container.

3. Next, run some hot water over the wicks at the bottom of the glass container to remove them.
4. Peel off any labels
5. Rinse out the glass container to make sure there is no wax or glue residue.  You can even take some nail polish remover and run it over the glass to ensure everything is removed.  This is important, as you will need a completely smooth surface for the glitter to adhere to.

6. Paint a thin layer of mod podge on the INSIDE of the glass container, covering the sides and bottom.

7. Pour in the glitter and shake it around until it covers all of the mod podge.


8. Allow the jars to dry completely!  Just a heads up, these took forever to dry!  I made them in the morning, and they were barely dry by the NEXT morning.

9. Once dry, you can fill them with beads (from Michaels Craft Store) and use them as brush holders, or skip the beads and fill them up with other little trinkets!


Let me know if you try making these!  I think they would make great little holiday gifts as well!

Thanks for reading

xoxo
linds&bells

IFB Follow on Bloglovin

Thursday, November 7, 2013

DIY Hair Masks!

As we approach the cooler weather, often times we see a big change in our hair and skin!  Personally, my hair gets frizzy towards the ends, but remains pretty oily on the scalp!  I thought I would compile some different recipes you guys can use to give your hair a little TLC this month to make sure its looking its best for the holidays!  PLUS most of these ingredients you may just have lying around your house!  I made these all in one morning, but they will keep well in the fridge for a few days!  

ALL HAIR TYPES

For this hair mask, you will only need two ingredients!  A ripe avocado and some honey!
To start, cut the avocado in half and scoop out the insides into a bowl.  Add one tablespoon of honey and mix together.  Next, add the mixture to your hair and let sit for 20 minutes!  The avocado has many vitamins and protein that your hair will soak up!  Rinse the mask out in the shower, and shampoo normally.


OILY HAIR:

If you have oily hair (yup, this is my category), you will need apple cider vinegar and one lemon.  Grate the peel of the lemon and add it to 1/4 cup of the apple cider vinegar.  Apply the mixture to your scalp and let it sit for 15 minutes.  Follow with a rinse in the shower!  The apple cider vinegar works to remove buildup on the scalp, so this is a great mask to do at the end of the week!


DRY HAIR/ FLAKY SCALP:

A dry and flaky scalp can be one of the most annoying problems- and not to mention embarassing.  Who likes looking like a snow globe?!  If you have persistent dandruf, this mask is for you!  You will need one banana, honey, and some almond oil.  If you can't find any almond oil, EVOO will work just as well!  Take half of the ripe banana and mash it up in a bowl.  Add two tablespoons of honey and 2-3 drops of almond oil or EVOO.  Stir all of the ingredients!  Apply the mixture to your hair and let it sit for 20 minutes!  For an added benefit, you can wear a shower cap over the mask to really lock in the moisture.  After 20 minutes, rinse it out in the shower!


__

Let me know if you guys try out any of these masks!  I would love to know how they work for you!

Thanks for reading
xoxo
linds&bells

IFB Follow on Bloglovin